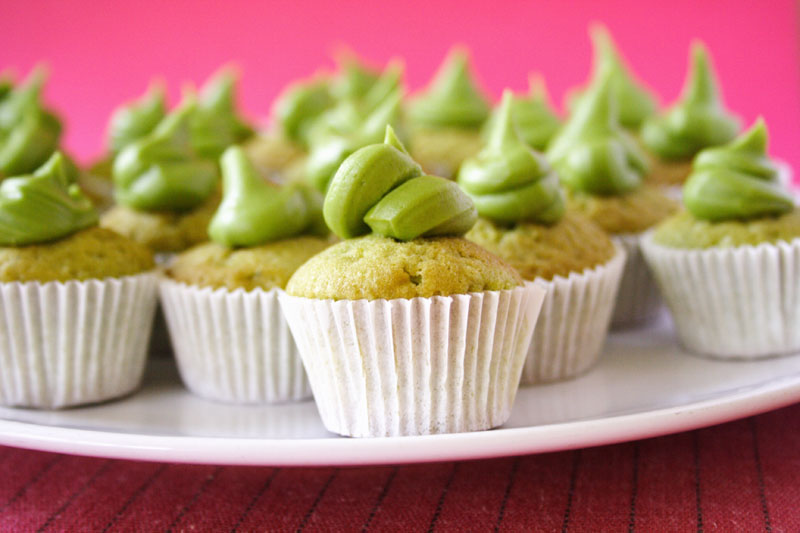
Saturday, September 30, 2006

Matcha Cupcakes

At the moment, Dan and I are going through a bit of a green tea phase and I've seen the evidence that this has spilled over to Dan's work place where they are practically performing tea ceremonies. Their current favourite is a Genmai-cha , a green tea with brown rice which is, I'm told, very relaxing and tastes nutty with an almost savoury edge.

In light of this, I decided to try baking something with the matcha powder, as I had seen a few recipes floating around. I decided to keep it relatively simple with matcha cupcakes. I used the cake recipe which was the base of Chockylit's Green Tea Lavender and Honey Cupcake Bombe over at the Cupcake Bakeshop. I made mini-cupcakes so that if someone didn't like it, they didn't feel obliged to eat the whole thing, but they went down so well, that Dan had to take the second batch to work the next day. The flavours were very prominent, even though I reduced the amount of matcha from the original recipe. The matcha powder itself was of drinking grade and has a high caffeine content with apple tones. I was able to order it online from the Japanese Kitchen.

Be warned - I think this has awakened a cupcake passion for me...


Matcha Cupcakes

Makes about 50 mini cupcakes.

110 grams of butter at room temperature
2 cups sugar
2 eggs
2 egg yolks
3 cups flour
2 teaspoons baking powder
1/8 teaspoon salt
1 cup milk
1 tablespoon matcha

Preheat the oven to 180 degrees Celsius. Beat the butter on high until soft and a touch lighter. Add the sugar and beat on medium high until light and fluffy. Add the eggs including the egg yolks one at a time beating well to incorporate between each addition. Sift together the flour, baking powder and salt. Add to the batter and mix until well combined. Whisk the matcha in with the milk and add slowly to the batter until well combined and mixed through. Spoon the batter into the cupcake papers until 3/4 full. Bake for about 12 to 20 minutes depending on cupcake size. Remove from tray to cool. Once cool, frost.

Matcha Frosting

110 grams of butter at room temperature
2 tablespoons of single cream
1 tablespoon of matcha powder
3 cups of icing sugar, sifted

Make a paste by adding the matcha to the cream. Whip the butter briefly and scrape down the sides. Add in the sifted sugar and matcha paste. Whip all together until it's a smooth, light and airy.

NOTES:
- I use a piping bag without a metal point to put the batter into the papers. It's so much easier and less fiddly (especially with the mini papers).
- I find I don't need a cupcake pan when doing the mini cupcakes. The papers hold up the batter on their own. If using medium or large sized papers, I would definitely advise using a pan.
- Taste test the batter and frosting to ensure the matcha is distinct in flavour. Different powders have different strengths, so make sure the batter is stronger than the end result that you wish to achieve. The matcha flavour remained, even after 2 days.


Tuesday, September 26, 2006

In preparation: Sloe Gin

Autumn is all about the anticipation, and one of the most anticipated events of the year for children and children-at-heart, is Christmas. Getting ready for is probably one of the best things about it. This year Christmas is at our house, if you want to come please feel free but if you don't that's fine too; we're happy to go it alone. So, in anticipation for Christmas, I'm starting a series called "In preparation" which will highlight all of my cooking in readiness for the 25th of December.

First off the mark is Sloe Gin, aptly named because it takes quite a while to mature and the longer you leave it the better. It's made from sloes and better if picked from a forest. I picked mine from eBay, which was much easier and less time consuming. They were in excellent condition and even came with a free recipe. Ah, eBay...

A pound of sloes is best to sit in a litre of gin. About 500-600 grams of sugar is needed, depending on personal taste. We picked the sloes over, removing the twigs and leaves and any that were overly crushed. Each berry was then painstakingly pricked a few times with a skewer - which will allow the flavour and colour to leach from the berries. They were then added to a sterile bottle with the sugar and gin. The bottle was then gently shaken to ensure that all of the sugar was wet.

Every day we tip the bottle over to see that all the sugar is being dissolved, and everyday the colour deepens slightly. In a few months we will decant into smaller bottles, straining and discarding the berries (I wonder if there's a use for them somewhere). Come Christmas, we will enjoy a bottle, and have a few extra spare for unexpected guests.


Saturday, September 23, 2006

Breakfast Muffins

This morning I didn't feel like toast or museli and we didn't have any yoghurt, so I decided to whip up a small batch of muffins for breakfast. I used my failsafe muffin recipe (found after the jump) as a base and added suitable breakfast ingredients. I had one blackening banana, a quarter of a cup of walnuts, half and half of wholewheat flour and plain flour, a few tablespoons of Fenland Honey (recently acquired at Ely Farmer's Market) and gave the tops a scattering of muesli. I halved the recipe and four jumbo muffins were enjoyed with a cappucino and fresh Copella Apple Juice. I'm full now.

Base Muffin Recipe

300 grams of flour
3 teaspoons of baking powder
1/2 teaspoon of salt
2 eggs
80 grams of castor sugar
220 millimetres of milk
100 grams of butter (melted)

Sift the flour, salt and baking powder. In a separate bowl lightly mix the eggs, sugar, milk, butter and if using bananas and honey, add them now - bananas mashed. Add the dry ingredients over the wet ingredients and fold with a big spoon quickly taking care not to overmix. It should still be lumpy otherwise the final result will be too heavy. Fold in any other mix-ins to be added (like walnuts). Spoon into a muffin pan and sprinkle with muesli (if using). Bake for 15-20 minutes in a 200 degree Celsius oven until well risen and brown.

Tuesday, September 19, 2006

Täytekakku - Filling Cake

This is a relatively easy cake to construct. I first happened upon it in Finland and came across it at many celebrations for birthdays, confirmations and Christmas. But, although I had previously tried to make it before, for some reason, I just couldn't get it right. When my "sister", Laura, came to visit the other weekend, I insisted that she show me how to make it.

It is simply 2 sponge cakes each cut in half to make four layers. Each sponge is then doused in either a sugar syrup or a juice of sorts especially around the edges. (I believe that this is the step that I had always missed and why I could never get it right.) Then fruit is piled on the bottom sponge, a dollop of cream spread over the top of it and the next sponge is placed on top. Any combination of fruit works very well. We used raspberries for the first and third layer, and a jar of Ikea cloudberry jam as the second layer. Once all the layers have been constructed, cream is used to "ice" the cake and tinned peaches and left over berries to decorate.

I like to think this cake as relatively healthy compared to a traditional birthday cake with mounds of buttercream icing on top and not a piece of fruit in sight. It is also amazingly light, the sponge soaks up the fruit flavours and if truth be told, I like to call this a Finnish trifle. Except, it looks so much more appealing and regal. From now on, I'm going to adopt this as a birthday cake of choice!

I'm also entering this into Foodography 9 hosted by Andrew. All entries can be found over at Flickr.

Tuesday, September 12, 2006

Seaside sights


Dan particularly wanted to go to the seaside. Specifically Southwold. It was a bit of a risk that we took with the weather being a bit fickle as to its intentions for the day - but since we had rented a car we thought it was a risk worth taking.

The English seaside holds so much romance to me. Only the English call it "The Seaside", so old-fashioned sounding. It's a place to go "sea-bathing" and to frolic in the chilly waters. Luckily for the weather, there weren't as many people as there could have been - and equally lucky, the rain held off and in fact the sky was full of the most amazing clouds.

Dan took his 60 year old military camera (Fed II - ex-Russian) with him and took all of the black and white shots. It's amazing how the age of the camera reflects in the photographs he took. He developed the film the same night and scanned them for us all to enjoy.

Of course, a day like that day would not have been complete without fish and chips. We scoured the pavements, beaches and streets - we followed the tell tale vinegar scent and found ourselves two servings of plaice and chips. Unfortunately, athough the original birth place of fish and chips, none that I have tried in England has tasted better than those served up in the take-aways of Australian beaches.


Thursday, September 07, 2006

To welcome Autumn, an Apple Tarte Tatin.


I like to think of August and September as sisters. August as the elder, with a quiet nostalgia about the end of Summer, September - a little more fickle and flirtatious. This year, they're trying on each other's wardrobes. While August was quite grey and rainy, September has a sprightly bounce in her step and is enjoying the bright yellow, green and red hues of Summer. It's yet to be seen whether she likes this makeover, but personally, I think she suits the duller greys. Perhaps I'm biased - since Autumn is my favourite season.

I think it's the anticipation of Autumn that I like the most, and although as a teenager I thought that being anticipated was a sign of weakness - and even wrote a poem about it, I'm passed that now, and the feeling of anticipation brings together hope and excitement. And Autumn, to me always brings hope and excitement.


Now is the time to be planning for events up and coming. There's Christmas and New Year to think about, and holidays to plan for the next Summer. Usually its a start of a new year for Schools and Universities and it's during this time that I can feel the Earth aging elegantly.

It's also the time that I get to snuggle under doonas freely, without being scorned. Where I can light candles for comfort and have long luxurious baths. And most importantly, it's a time when cooking and baking is at its most enjoyable. With an abundance of produce, vendors are eager to let their overburdened stalls of vegetables and fruits go cheaply, and I'm just as eager to use them in preserves, cakes and stews. I usually have to hold myself back though, because most often than not it's more than our little fridge and kitchen can handle and more than we can consume reasonably without making a glut of ourselves.

So I welcome Autumn with a flourish with this tarte tatin. A dessert I hadn't heard of before coming to England. I turned to one of the best sources of French food and recipes on the web today, Chocolate & Zucchini, and Clotilde didn't disappoint. A recipe handed down generations is one that's certain not to disappoint.


Caramel Apple Tarte Tatin

4 apples

For the pastry:
170 g flour
85 g sugar
85 g softened butter
a little milk

In a mixing-bowl, cream the sugar and butter with a fork. Add in the flour, and rub the ingredients together to resemble crumbs. Add in a little milk, and knead the dough to form a ball. The dough should be soft and moist and if it's soft and sticky add more flour to compensate. Wrap in plastic and refridgerate until ready to assemble.

For the caramel:
70 g brown sugar
35 g butter, cubed

Put 70 g of brown sugar in a small nonstick saucepan, and put over medium heat until the sugar melts. This may take some time. As soon as it's melted, lower the heat and continue stirring, add in the butter and stir until the butter and sugar have combined. Pour this paste into a non-stick cake pan, and spread it over the bottom. Arrange slices of the apples that have been peeled and cored.

Preheat the oven to 180 degrees Celsius.

Roll the dough out on a lightly floured surface. Roll into a circle slightly larger than the cake pan. Place the dough over the apples and tuck the edges in around the apples with a bread knife. Prick the dough with a fork in a few places.

Put into the oven to bake for 45 minutes, until the dough turns golden.

Invert the tarte onto a plate and let cool slightly. It's definitely best served warm. Serve with cream or softened icecream.

Search Daydream delicious...